Pressure canning has become my new passion. I enjoy cooking of all types, but to be able to make a big batch of food and put it up for later without the need of refrigeration is simply amazing. Of course our ancestors have been doing this for many, many years. According to the USDA, home canned foods have the highest nutrient value if eaten within one year, (however many people I know personally have kept them much longer with no problems.) The most important thing is to make sure they seal, and stay sealed. For quart size jars as shown you are going to need a full size pressure canner. I have the Presto 16 qt which I love. I can put in 7 quarts, or 10 pints at a time. I also have the electric Nesco Pressure Canner which may be my favorite now for smaller batches, (max 4 quarts or 5 pints)
It is so much fun, and productive.
Ingredients:
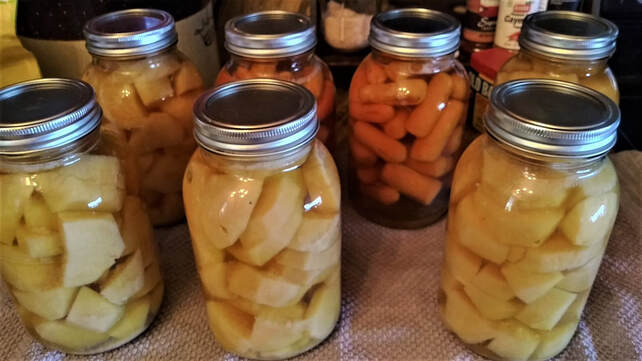
7 lbs of potatoes peeled, washed and chopped to desired size
2 lbs of carrots peeled, washed and chopped (or you can buy baby carrots and use whole)
4 tsp Pink Himalaya Salt or Canning Salt, Sea Salt etc.
2 tsp garlic powder
Make sure your jars and lids have been cleaned and sanitized. (I run them through the dishwasher right before using..) Fill jars with the raw potatoes and carrots until almost full Put a 1/2 tsp of Himalaya Salt in each jar, and I like to include a 1/4 tsp of garlic Powder in each jar of potatoes. Fill with warm water to just below the the bottom line of the rim that the lid screws onto. (approx one inch below lid) Use a plastic knife or other non metallic de-bubbler to stir and release any air bubbles. Use a paper towel dipped in vinegar to wipe the rims very clean. Put your warm lids on and lightly tighten the rims. Add 8 cups of warm water into the canner. Place the quart size jars in your canner on top of the raised grid that comes with it.. Put lid on securely. Turn heat on high and allow to vent hot air for 10 full minutes. Then put your weighted regulator on the top over the vent or on your electric canner, simply close the vented regulator. Once the pressure canner comes up to pressure, adjust your heat accordingly so the weight just has a steady rocking motion. (mine rocks perfectly between low and medium heat) Set timer for 40 min after pressure has been released. (with the electric canner you do not have to fuss with the weight or do anything, it is all automatic) Once your timer goes off, simply turn off burner, or unplug. Do not do anything else, let the pressure release naturally, this may take an hour or more. Only after pressure is gone may you remove lid. I usually remove lid, let it sit another 10 min, then remove the jars. You will start hearing the can lids "POP" as the lids seal. Let them cool at room temperature for 24 hrs before washing the jars and lids well before storing.
Please note these are very lightly seasoned vegetables, but they are absolutely delicious as is. I suggest you keep them lightly seasoned until you are ready to use them, then add some additional seasonings if needed. when you reheat them. If you are making only carrots, reduce the cooking time to 30 min. (Potatoes do take 40 min, so if mixing your vegetables in same batch always go with the longest cooking time)
Disclosure: This is just my technique, it may or may not be considered a bit of a "Rebel Canning" style to some, but it works for me. For all Safety Concerns, and special tips and techniques for successful canning, I highly recommend The National Center for Home Food Preservation.
It is so much fun, and productive.
Ingredients:
7 lbs of potatoes peeled, washed and chopped to desired size
2 lbs of carrots peeled, washed and chopped (or you can buy baby carrots and use whole)
4 tsp Pink Himalaya Salt or Canning Salt, Sea Salt etc.
2 tsp garlic powder
Make sure your jars and lids have been cleaned and sanitized. (I run them through the dishwasher right before using..) Fill jars with the raw potatoes and carrots until almost full Put a 1/2 tsp of Himalaya Salt in each jar, and I like to include a 1/4 tsp of garlic Powder in each jar of potatoes. Fill with warm water to just below the the bottom line of the rim that the lid screws onto. (approx one inch below lid) Use a plastic knife or other non metallic de-bubbler to stir and release any air bubbles. Use a paper towel dipped in vinegar to wipe the rims very clean. Put your warm lids on and lightly tighten the rims. Add 8 cups of warm water into the canner. Place the quart size jars in your canner on top of the raised grid that comes with it.. Put lid on securely. Turn heat on high and allow to vent hot air for 10 full minutes. Then put your weighted regulator on the top over the vent or on your electric canner, simply close the vented regulator. Once the pressure canner comes up to pressure, adjust your heat accordingly so the weight just has a steady rocking motion. (mine rocks perfectly between low and medium heat) Set timer for 40 min after pressure has been released. (with the electric canner you do not have to fuss with the weight or do anything, it is all automatic) Once your timer goes off, simply turn off burner, or unplug. Do not do anything else, let the pressure release naturally, this may take an hour or more. Only after pressure is gone may you remove lid. I usually remove lid, let it sit another 10 min, then remove the jars. You will start hearing the can lids "POP" as the lids seal. Let them cool at room temperature for 24 hrs before washing the jars and lids well before storing.
Please note these are very lightly seasoned vegetables, but they are absolutely delicious as is. I suggest you keep them lightly seasoned until you are ready to use them, then add some additional seasonings if needed. when you reheat them. If you are making only carrots, reduce the cooking time to 30 min. (Potatoes do take 40 min, so if mixing your vegetables in same batch always go with the longest cooking time)
Disclosure: This is just my technique, it may or may not be considered a bit of a "Rebel Canning" style to some, but it works for me. For all Safety Concerns, and special tips and techniques for successful canning, I highly recommend The National Center for Home Food Preservation.
